In our last post, we walked you through the many Premiere Pro preferences windows. But that’s not the end of it! Some of the most important settings are not found there. Probably the first thing you really need to configure is your sequence settings.
Sequence settings
Setting up your sequence in Premiere can be easy or mindless.
Wait, what?
Let’s start with “mindless”:
Go to the File menu and select “New Sequence” or hit Command-N. You’ll get this “New Sequence” window with lots of complicated presets and technical stuff:

Ignore it.
Hit okay,
Now load your source clip into your Source monitor and drag a shot into the Timeline.
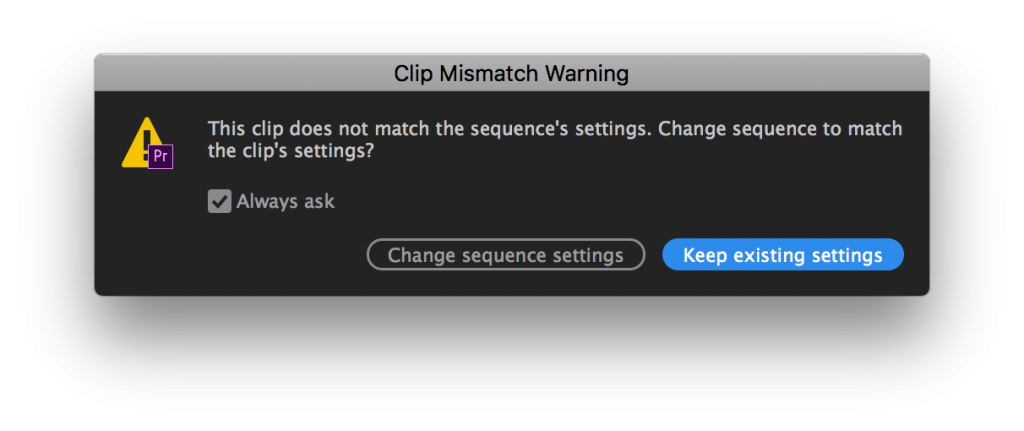
A window that looks like this will pop up:

Select “Change sequence settings.”
Done! Adobe just automatically adjusted the sequence settings to match your footage.
Who this works for:
Projects with only one type of footage, simple projects destined for YouTube, Vimeo, etc.
But maybe you want a little more control. Don’t worry, it’s still easy.
The easier-than-it-looks method
For those who want to really understand how their sequences are set up, start by following the steps above to create a new sequence. Instead of ignoring the “New Sequence” window, use it to tell Premiere what you want.
On the left side of the screen is a big list of presets based on popular formats. If you see the camera you shot with on this list, it might save you a bit of time. But a lot of editors don’t have that sort of information. That’s fine, because you don’t really need to know the camera. What you need to know is the frame size and the frame rate for your project. For most projects this will either be 4K, 2K or HD at 23.976 fps (frames per second). You can just ignore the presets and enter this information here. (4K is 4096 x 2160 pixels, UHD is 3160 x 2160, 2K is 2048 x 1080, and HD is 1920 x 1080 or less commonly 1280 x 720.)
By selecting the “Settings” tab you can enter this info yourself. Audio is almost always 48000 Hz and popular opinion says that you should set your video previews to “QuickTime” and “Apple ProRes 422”, either LT for full-resolution footage or Proxy if you are working with proxies.
Now that you’re here you can also click on the Tracks tab and create a default number of audio tracks for each new sequence you create. I prefer to limit the number of audio tracks to 12 in the early stages of editing a project. Later you’ll need more but in the beginning too many tracks can slow things down. Premiere Pro gives you a lot of types of tracks to choose. For simpler projects, I prefer “Standard” which can contain mono or stereo tracks. Later when you make your final output, you’ll choose an appropriate mix (stereo or 5.1).
If you’re working on a project destined for a professional audio mix, I recommend 8 tracks that are mono and 4 tracks stereo (ie 2 stereo pairs). Typically when you edit, your production sound is mono and your music is stereo. So the first 8 tracks will contain production audio (dialogue, interviews, and ambience) and the last 4 tracks will be for music and stereo sound effects.
And don’t worry, if you run out of tracks when you’re editing, you can always add more.
Pro-tip: Create an empty sequence
Once you’ve created your new sequence, make a copy of it and call it something like “Blank Sequence” or “Sequence Template.” Save it somewhere easy to locate and from now on, instead of using Command+N (or File > Create New > Sequence), just make a copy of this sequence and rename it. You won’t have to go through all these settings again.


